
My fondest memory of my grandfather is visiting his shop and looking at all his woodworking tools. He would show me what they were for and how to use them. Stanley and his wife, Martha, were from the old country, immigrants of Czechoslovakia. I credit my grandfather with my woodworking and tinkering skills. Anytime I use my hands to build something, I think of grandpa.
I can’t take credit for the following hack. I stumbled on it one evening surfing through ice-fishing videos on YouTube. I filed it in the back of my head last year as a project to work on before this year’s ice fishing adventures. As luck would have it, we’ve had a warm stretch here in Great Falls and, combined with a nice ten-day off stretch, I decided to get my act together and make the Ice Sled Ski Hack.
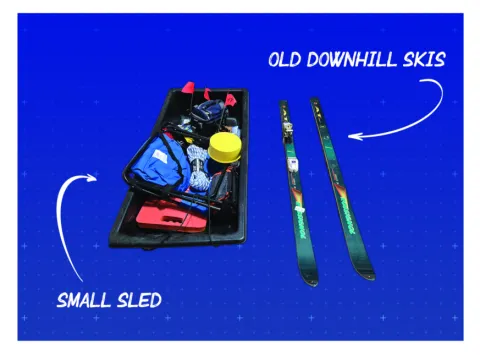
Those of you who ice fish are probably familiar with ice sleds. Piled high with our always-growing essential items, these sleds are designed for transporting your gear across the snow and ice of frozen lakes. Sleds are functional and a must for ice anglers. That said, as “essential” gear grows, anglers (especially we senior citizen anglers) get to deal with heavier sleds. Dragging a sled a few hundred yards can get to be a pain in the back, to be felt hours after the fishing day is done. The Ice Sled Ski Hack makes it easier to pull your sled across snow or ice. It’s an ingenious hack and works exactly like it looks, elevating the sled on two skis, allowing the sled to slide more easily, with less resistance.
This hack is a breeze to build, requiring a minimal number of tools. A saw, a power drill, screws, and a screwdriver will get the job done. There are a variety of designs posted on YouTube, and it’s easy to come up with your own design once you see what others have made.
The most important part of the ice sled ski hack is (of course) the skis. Fortunately, the investment is minimal. There’s no need to go out and buy a new set of snow skis. Instead, pay a visit to your nearest Goodwill, St. Vincent DePaul, or Salvation Army store. There, you’ll find a variety of inexpensive used skis perfect for our purposes. You’ll want to buy downhill skis, not cross-country skis. The reason for this is that downhill skis are shorter, wider, and thicker. You don’t need a long, thin cross-country ski. If you have a smaller sled, find a pair of used kid skis; otherwise, adult skis for a full-size sled are perfect.
The first thing that needed to be done was the hardest part of this project, for me, removing the ski bindings. The bindings are screwed into the skis, and you’ll have to find what to remove to get access to those screws. Fortunately, between YouTube and an internet search, I was able to figure it out (and you will, too).
With the bindings removed, the next step is to construct a platform on which your sled will rest. I spaced the width of the skis to the width of the sled. Onto each ski I screwed on a four-foot-long 2x3-inch board, which matched up perfectly with the width of my skis. The purpose of the wood is two-fold. First, it gave me a solid structure to build from, and second, it raised the sled up off the snow. The whole point of this hack is to ride the sled on the skis and not have the sled drag on the snow. You may have seen some sleds that come with runners installed already, and while those runners certainly help, the sled is still dragging along the ice. The beauty of the ski hack is that the sled is gliding on the skis. And for those of you who have ever skied, you understand the advantage of this system.
The frame structure that the sled will rest on can be made with a variety of materials and ways. For my project, I decided to use 1 ¼” PVC tubing, lining up three cross-frames, and securing them with plumbing straps, then a couple of screws through the tube into the wood. Be sure to square up the skis so they are parallel, otherwise your ski sled will not track straight. I added two cross beams made of 2x3 wood to strengthen the frame.
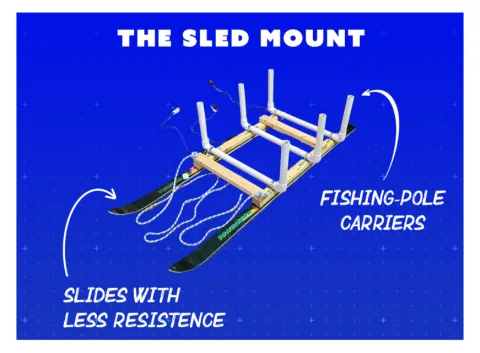
Wrapping up the project, I added 90-degree elbows on the PVC tubes and then 14” vertical tubes for side support and as rod holders. Finally, circular eye bolts on the front and sides of the frame serve as connection points for the tow rope and bungee cords that will hold the sled to the frame.
Project completed, I tested the ski-sled on carpet - December 24th, and we have no snow on the ground here in Great Falls (that won’t last!). The ski-sled slides effortlessly with just a fraction of the effort of pulling the sled without it. Success!
This was a fun and simple hack that will make my life much easier on the ice. If your sled is feeling a bit heavy with all your essential gear, give this setup a try!

